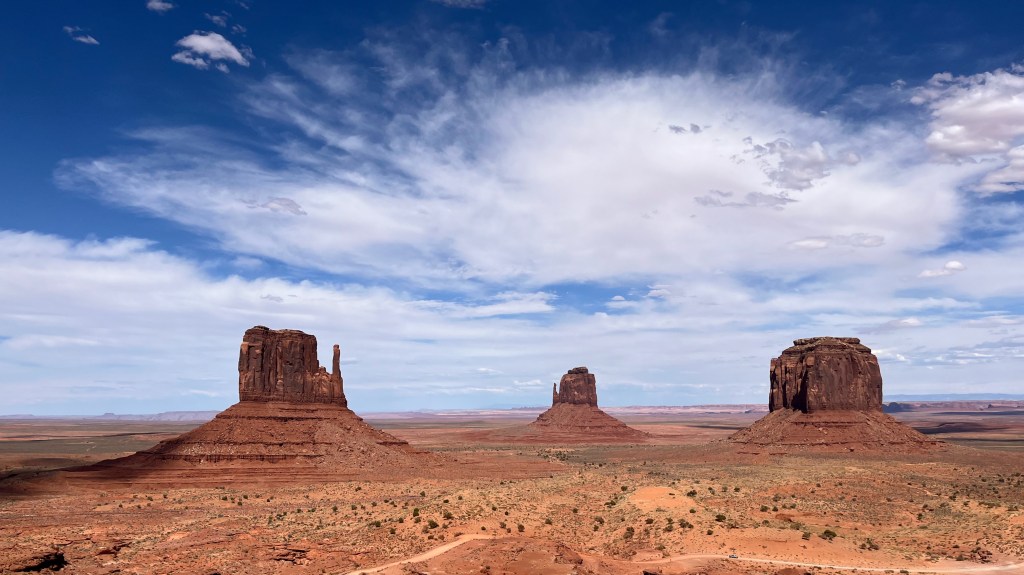
If you want to see majestic scenery or as the Navajo say “Where the Earth Meets the Sky”, you need to see Monument Valley in AZ. You can use pictures from here in the dictionary for the word “Drama”.
Monument Valley has some very interesting history. The valley formed about 250 million years ago or I should say started to form from erosion. The valley straddles Arizona and Utah. The entire valley which is over 90,000 acres, belongs to the Navajo Nation. The Diné (Navajo people) call it Tsé Biiʼ Ndzisgaii meaning “Valley of the Rocks.”
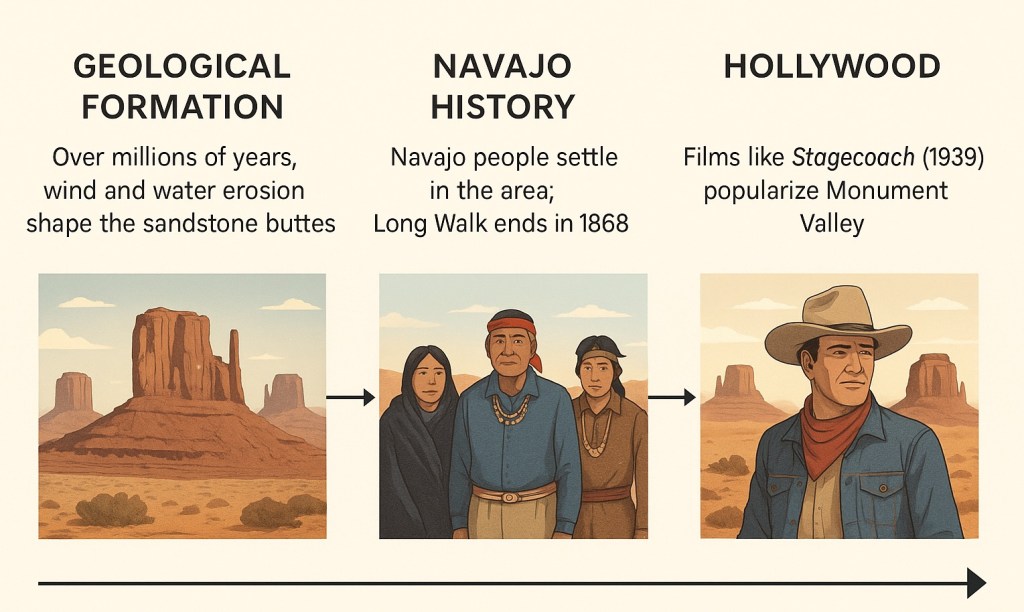
The shortened time line is shown in the graphic below. First it formed millions of years ago. The Navajo people settled in the area and about 1868, Monument Valley became part of the Navajo reservation. In the 30s, Monument Valley gained worldwide fame through its appearance in classic Western films, especially those directed by John Ford such as “Stagecoach”. John Ford would go on to shoot six more westerns in Monument Valley: Western films like My Darling Clementine (1946), Fort Apache (1948), She Wore a Yellow Ribbon (1949), The Searchers (1956), Sergeant Rutledge (1960) and Cheyenne Autumn (1964) were made in Monument Valley and not so western films like “Forrest Gump”. The scene where Forrest is running on a long stretch of road with a crowd behind him was in Monument Valley.
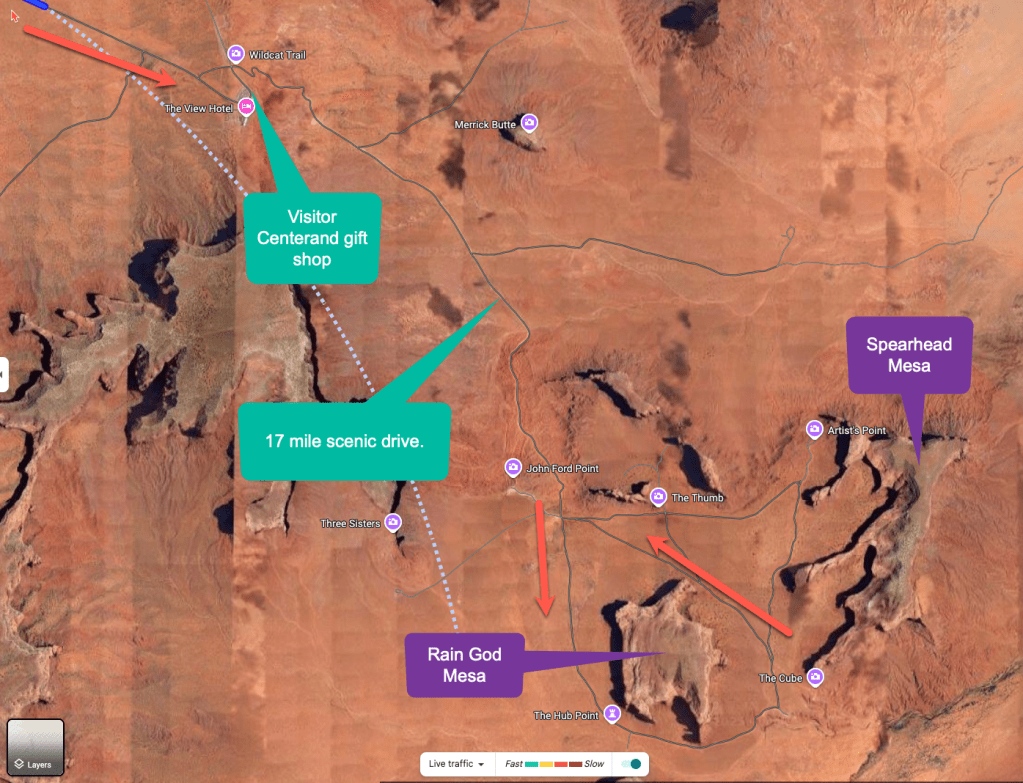
In 1958, Monument Valley Navajo Tribal Park was established and managed by the Navajo Nation. This is NOT a US National Park despite what people popularly believe. When you visit the park, visitors can take guided tours by Navajo guides, drive a scenic loop road, or explore on horseback. Of you can just hang around the visitor center and enjoy a great view. When I went in July 2025, it was 8.00$ USD per person in the car to enter the park. There is not any gas or EV charging in the park. The scenic loop is a dirt and gravel road limited to 15mph. And even at 15 mph, your car can take a beating from the rocks and gravel being kicked up for a few hours.
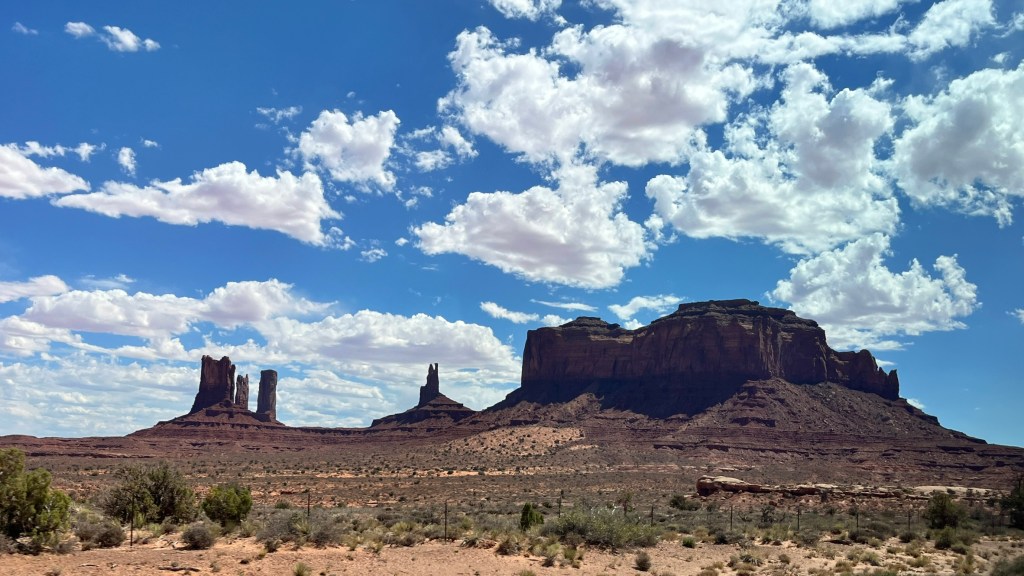
Monument Valley views
The views are spectacular in the early morning or late afternoons. The light and the shadows form some dramatic landscape to enjoy. If you are fortunate, there will be clouds such I had to enjoy which makes it look like a living painting.
When I visited Monument Valley, I came down from Moab UT following Highway 191 with a charge in Bluff, UT. Then I took Highway 163 to Monument Valley Road and turned left. Its pretty hard to miss unless you keep staring at the landscape 🙂 Be warned, the last supercharge for Teslas is Bluff UT. I would strongly suggest you charge to at least 90% state of charge. If yo have an older short range Tesla, you do not belong on this route. I have a LR Y and at 90% I arrived at the next supercharger in Kayenta at 28% and that was without driving the 17 mile dirt road scenic drive. If you have a CCS EV, its even tougher. The Super Charger in Bluff is not compatible with CCS even with an adapter. Your best bet as a short range Tesla or CCS is to start in Kayenta at 90% and head into Monument Valley from there.
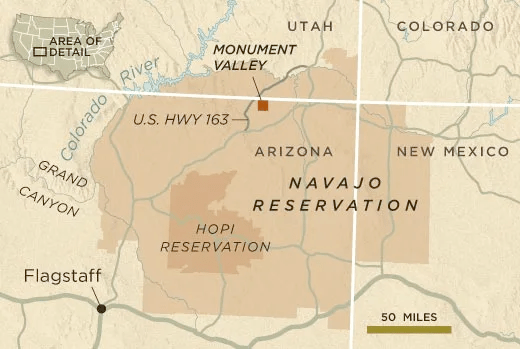
This is a graphic showing the border of the entire Navajo Reservation and the location of the monument valley within the reservation. Keep in mind that you are a visitor to the reservation and it is operated under their rules. For detailed informaton on laws, customs and geneneral behavior guidelines, check out “Visiting the Navajo Nation”. It will cover far more detail than I can put into a simple blog post.
Bring your camera. you may think that is self explanatory but you would be surprised how many people do not bring one. If you use a smartphone which I did for this trip, you can still get amazing pictures but it will not be “point and shoot”. Smartphones are very good at what they do but the extremes in lighting here requires you to intervene a bit.
Here is an example of point and shoot. It is an OK snap shot. Nothing really special. I am shooting from the wrong side which means I’m shooting into the dark shadows cast by the afternoon sun. The bright sky makes the camera think it’s lighter than what it really is. So I have darks and washed out colors and a nice sky.
Positioning is everything with high contrast images. You want the shadows to be oblique across the rock structure, not total shadow.
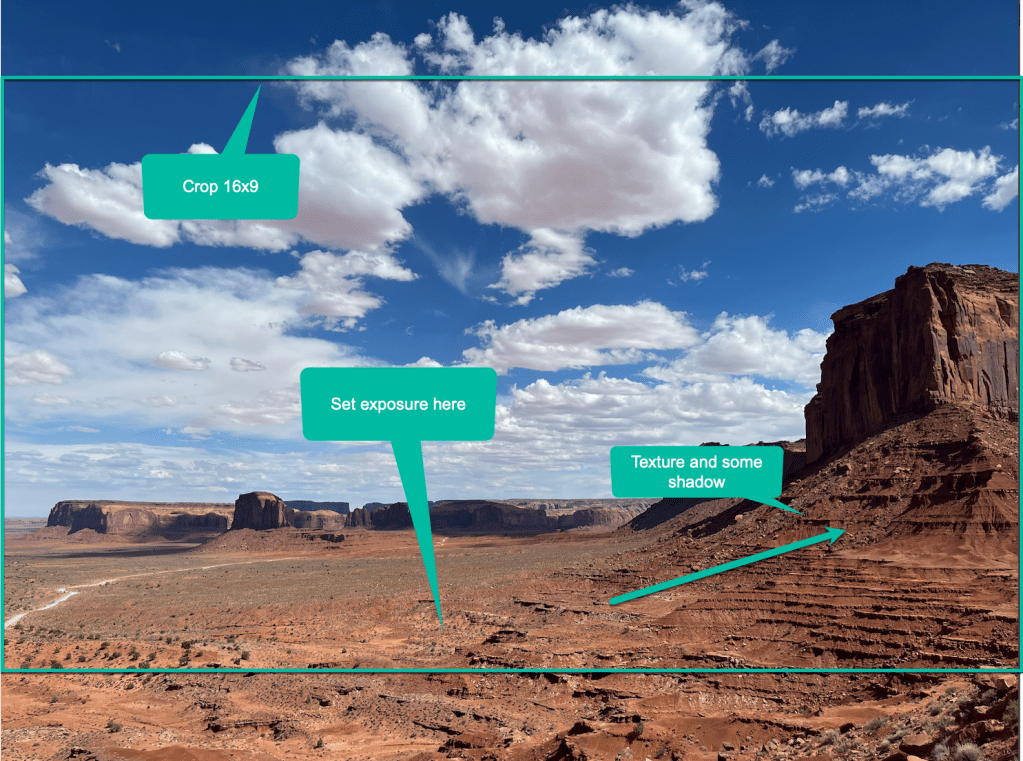
In this image, you can see how I plan to crop the image to a 16×9 to make it more “scenic”. I set my exposure by manually selecting where the camera was going to set it exposure from. And I am in such a location that I get the nice side shadow for drama. You almost always have to do some post processing in extreme images like this to really make them stand out
Here is the same image with some editing. I did the 16×9 crop but cut down on the sky even more. I moved slightly more to the right which gave me more of the rocks in the foreground. I bumped up the white balance to push up the reds and oranges. I adjusted the blue luminescence to darken the sky slightly. All of this was done my iPhone using the Apple default editor. I could have used Lightroom mobile to really dial it in but that is beyond this post.
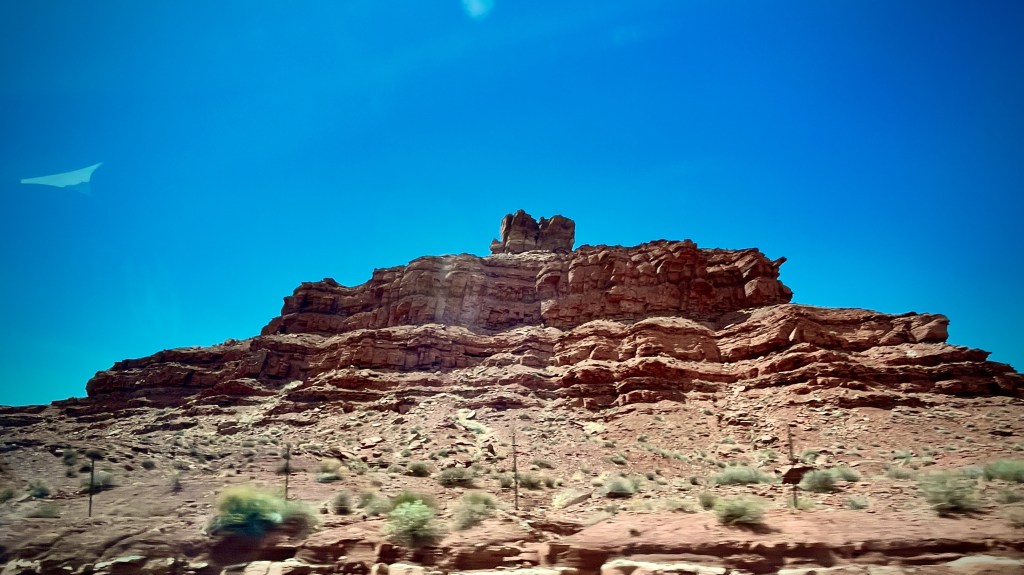
Mexican Hat. I shot this from the car as a passenger on the way to the Monument Park entrance. Do not discount shooting images from the car or truck. The bright light makes for high shutter speeds and often you will be shooting something far away so motion blurring wont be much of a problem unless it’s very early or very late in the day.
Mexican Hat
Unless you have a high clearance AWD SUV or truck, and you do not care about the paint, I would suggest taking a guided tour. Not to mention that with a guide, you will get more local information than reading the pamphlet they hand you as you drive into the park. Not to mention that if something happens to your car, it’s a long wait and a very expensive tow out of the park. Remember that many newer cars do NOT have spare tires and these can be rough roads. A flat here would be very expensive all the way around. This company offers tours at a reasonable price and is well regarded. They use four wheel drive vehicles that are air conditioned and bottled water.
When you bring your camera, a few things need to be packed. I’m assuming a “smart phone” for 90% of you. So this is focused to you. Bring the phone in a solid case like Otterbox or Speck. Dropping it on rock is a fast way to break the phone. Bring a ND filter of 1 stop or 2 stops. Bring gaffers tape to tape the ND filter over the camera’s lens. It can be VERY bright between the sky and the rocks. So trying to dial back the exposure can be a real challenge. But with the 1 stop filter taped in place, you can have some wriggle room in your exposure. Bring a good selfie stick. Bring a good travel tripod. Make sure ahead of time the tripod will hold the phone IN THE CASE. This is assuming you want to play in the early AM or late afternoon with the shadows and having your camera on any tripod will help get a sharp picture. Make sure to bring a blue tooth trigger so you dont need to touch the camera OR use a timer function to trigger the camera a few seconds after you set it up. Bring a lens cleaning cloth and a dust brush. There is a TON of dust in the air whether you see it or not. Dont use your sweaty shirt to try and rub clean your camera lens. I have a special lariat loop that fits over my wrist in case the phone slips. This is a camera hostile environment. Bring a power brick and cable. Shooting lots of pictures or shooting video will eat the battery. And you are on a two to three hour tour. That will be a ton of pictures 🙂
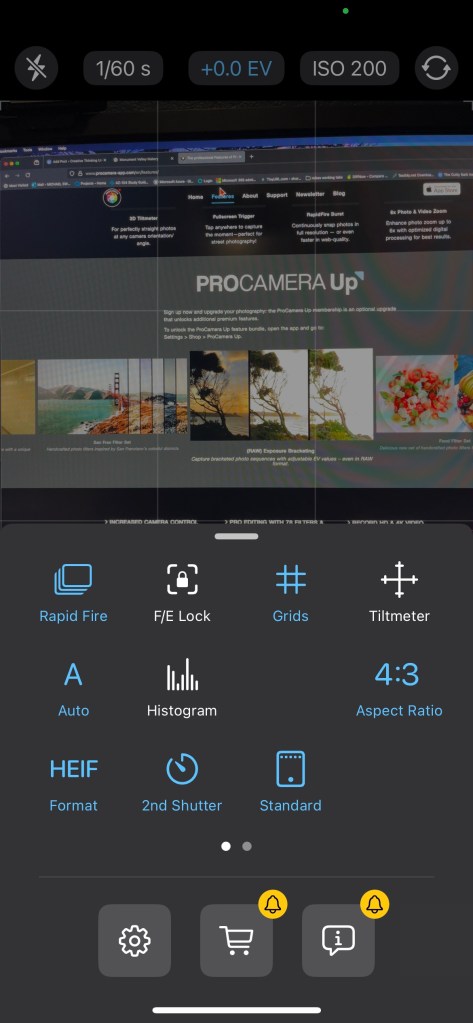
Download and spend some time to learn to use a “manual” camera app like ProCamera. It offers much more control over the exposure than the OEM photo app. You can manually set the shutter speed, ISO and more. You can also shoot “RAW” which means the image will have minimal processing done by the camera and virtual no compression. This gives you the most information to work with in post processing. On the other hand, a RAW image sucks up space because the files are 5-10 times the size of a JPEG.I save this for “special” shots that I know I want to heavily work on in post processing.
This screen shot is a sample of the ProCamera interface and shows a few of the choices and adjustments available to the iPhone user. For the android users reading this, check out ProCamX. I personal have not used an Android since the S7 so I wont say it’s the best app but it does come as a recommendation from friends that use Android. So take this information with a grain of salt 🙂
Screenshot
Monument Valley is an amazing place to visit and photograph. The Navajo are a welcoming people if you respect them and their beliefs. The valley is a bit off the beaten path but well worth effort. I would suggest if you are serious about photographing the valley to plan on staying overnight at one of the hotels. That way you can see morning and afternoon light. I would also suggest talking to a guide and explain what type of images you are trying to shoot and they will certainly have good ideas how and where to get them. Make sure to be friendly and be sure to tip for extra services like special excursions for photography. Everyone likes to be appreciated. Above all, enjoy your visit. Its a one of a kind place and definitely a memory maker.
If you want a “pod cast” audio of this post, check out this link.


Leave a comment